HomeNavigation arrowBlogNavigation arrow
Current page
Feature Updates

Candy’s Weekly Recap: Simple Check-In™, New Products Report, and Lots More ✨

Candy’s Weekly Recap: Simple Check-In™, New Products Report, and Lots More ✨
Hello, my fabulous photographers!

Candy here, ready to sprinkle some sparkle on your day with our latest Weekly Recap. We’ve been hard at work enhancing your NowCandid™ experience, and I’m thrilled to share all the juicy new features. Let’s dive in!

1. Simple Check-In™ for Positive ID Events 🤳

We’re introducing a brand-new way to make your Name Lookup and Scanner ID™ Workflows even smoother:

  • Single QR Code: Print just one QR code for the entire event. Participants scan it, enter their name and contact info, and a “blank” participant is instantly created—no selfie required.
  • Photographer & Wallet Benefits: Photographers can now quickly search by name if the event uses Name Lookup, or if the participant adds the pass to Apple Wallet (Google Wallet coming very soon), you can scan them later for Scanner ID™.
  • No More Bulk Scan Cards: Skip printing individual codes for everyone—one event code can do it all!

Scan Cards are still great in many situations, so this isn't a replacement - just an addition! Something to make the Name Lookup & Scanner IDWorkflows even more flexible!

Accessible by clicking the QR code within a Positive ID Event's Management Page

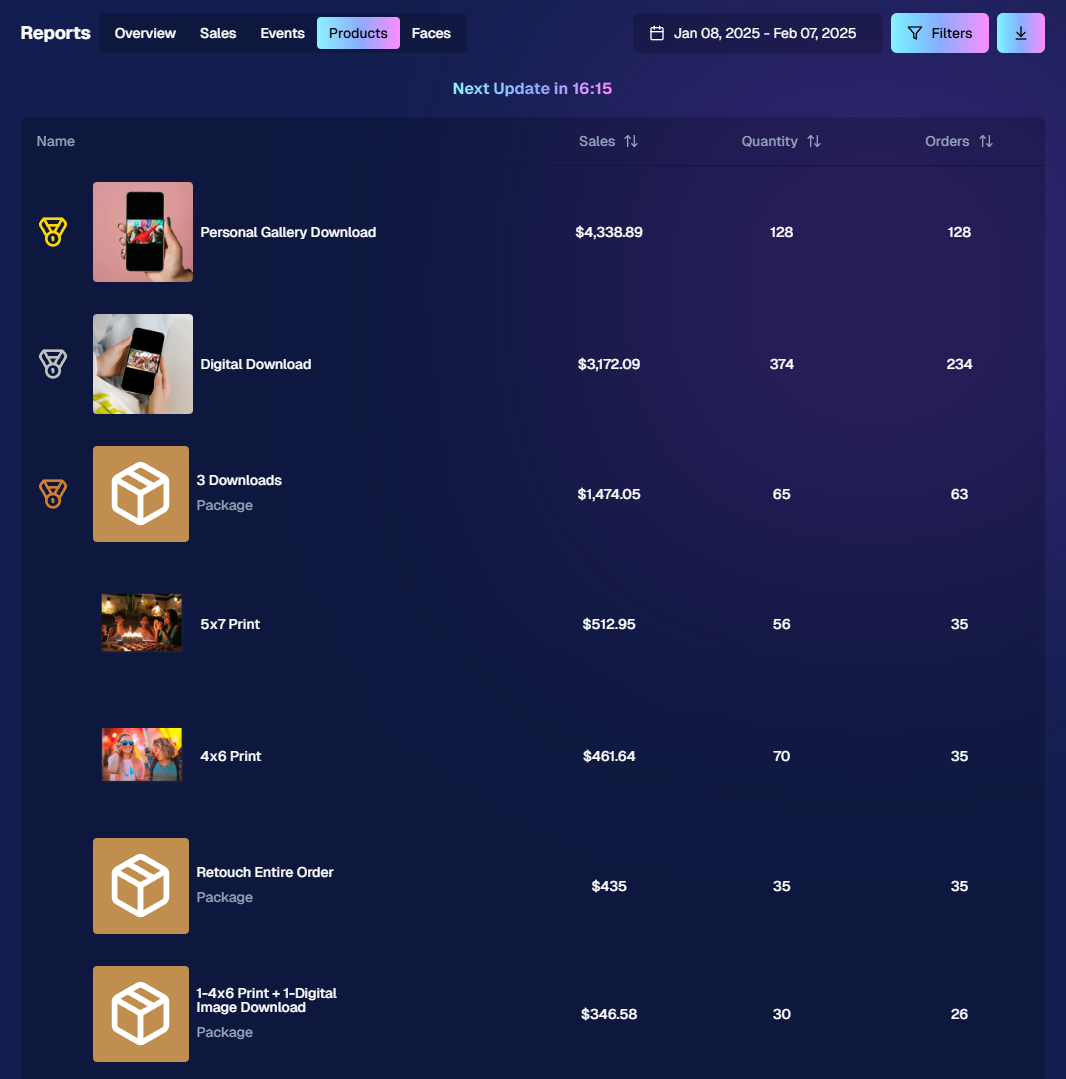
2. New Products Report 📈

We’ve introduced a new Products Report on your NowCandid™ web dashboard:

  • Most-Purchased & Highest-Revenue Products: See which items or packages your clients love most.
  • Standard Filters: Use the same powerful search options you know—by event, date range, program type, Event Tag, and more.
  • Data-Driven Decisions: Identify your top performing items and make more informed Custom Offer adjustments!

If you’ve been curious which prints, downloads, or merch are hot, this is your new go-to spot!

Accessible from the Home tab of the web dashboard

3. Image Management Additions:

Multi-Select Enhancements 🛠️

We’ve expanded multi-select capabilities in Manage Images to handle even more tasks at once:

  • GroupTags: Now you can edit or remove GroupTags™ for all selected images simultaneously.
  • Select All Visible: Quickly grab every image on the current page to speed up those bulk actions.

Accessible using the multi-select button within an Event's Manage Images page

New Folder-Wide Options 📂

We also added a new Edit Folder button when a folder is selected:

  • Change Folder Visibility: Toggle an entire folder’s images between visible or invisible.
  • Group Status: Mark them as Group Photos or individual images in one go.
  • GroupTag: Apply the same GroupTag™ to every image in the folder—super handy for sorting large event albums.

Mass management, simplified!

Accessible using the Edit Folder button within an Event's Manage Images page

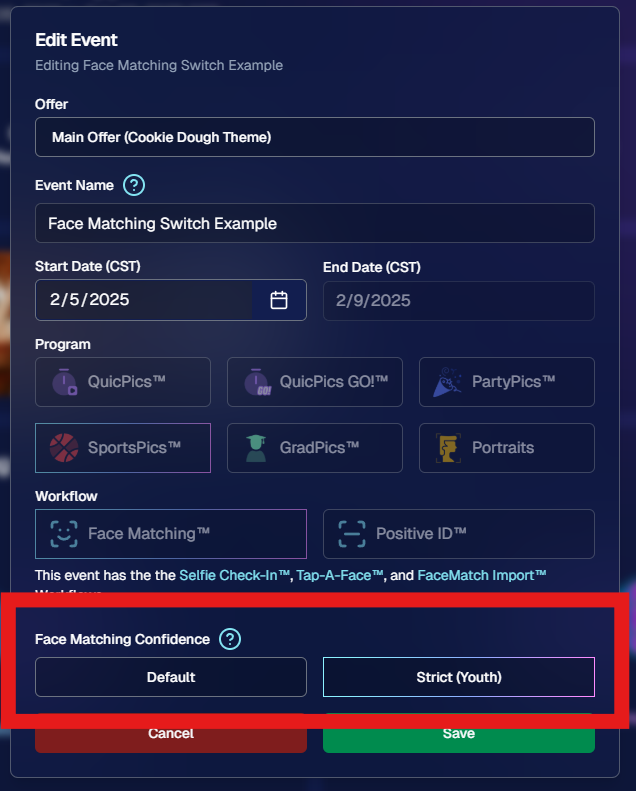
4. Face Matching™ Formula Switch 🧩

We added a new toggle in Edit Event to adjust how strict or lenient our Face Matching™ algorithm is:

  • Stricter Matching for Kids: If you’re dealing with lots of little ones who keep popping up in the wrong gallery, flip this switch for fewer “extra” matches.
  • Default Remains Flexible: Our usual method still works great for most events. If needed, you can always manually unassign images from a participant in the dashboard.

Less confusion, more accurate galleries—everyone wins!

Accessible when editing a Face Matching type Event

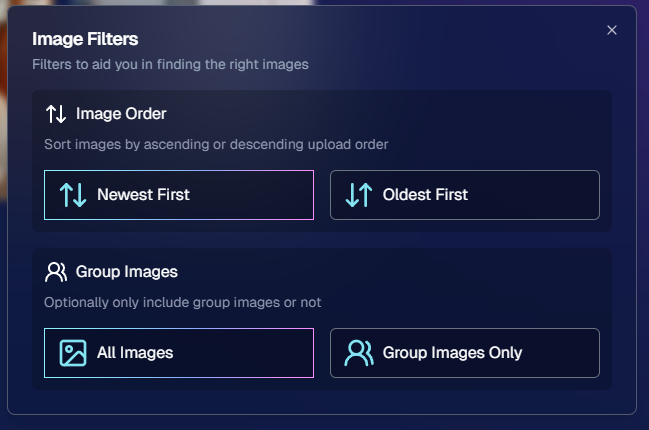
5. Manage Images: New Filter Menu 🖼️

We’ve reorganized the Manage Images page with a dedicated menu for filters:

  • Cleaned-Up UI: Too many filters were crowding the page; now they’re in one easy-to-access spot.
  • Clear Active Filters: It’s easier to see what’s on and what’s off, plus you can remove filters with a single click.

Navigating your images should feel more intuitive and less cluttered than before.

Accessible using the Filters button within an Event's Manage Images page

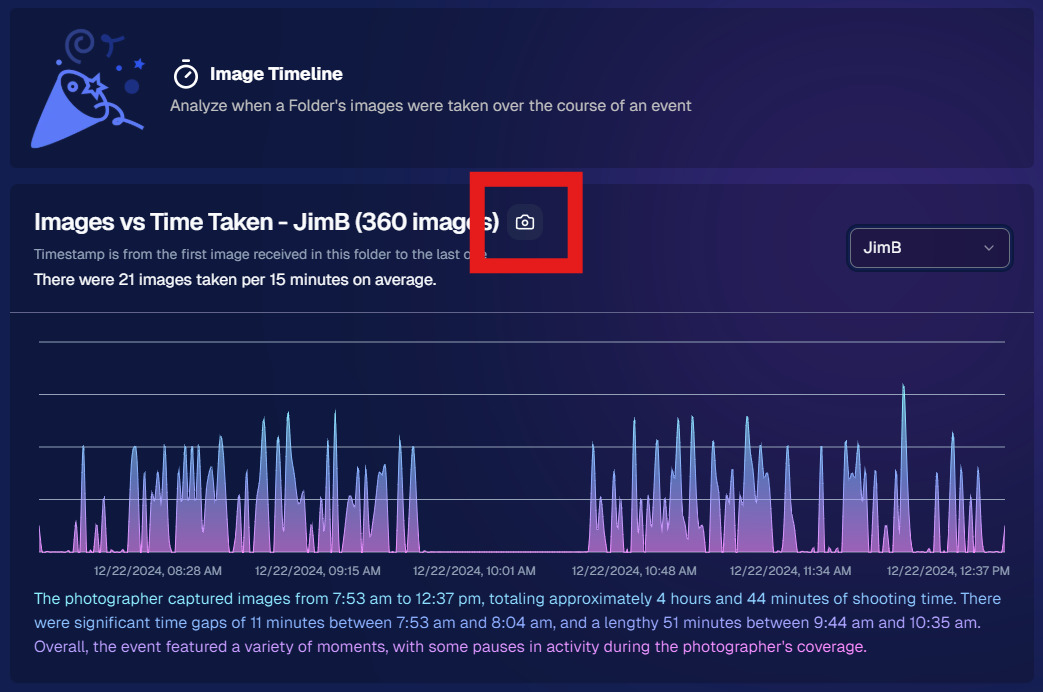
6. Image Timeline Screenshot Download ⏱️

Our Image Timeline feature now has a handy Download Screenshot button:

  • Quick Sharing: Snap a chart of your shooting pace or AI analysis and send it to your photographers or team.
  • Easy Feedback: Show them exactly where the busy or slow spots were without extra steps.

A small detail that can make a big difference for team communication.

Accessible using the Camera-icon button on an Event's Image Timeline page

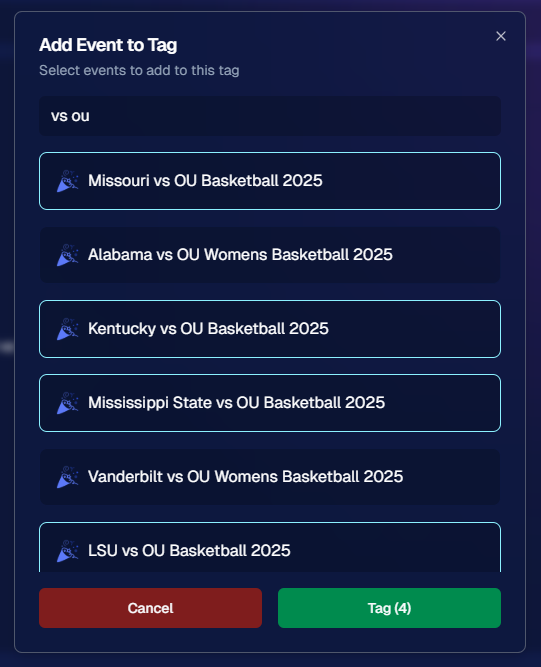
7. Event Tag Add Popup Improvements 🏷️

When adding events to a tag from the Event Tags page:

  • Select Multiple Events at Once: No need to add them one by one.
  • Filtered Display: It only shows events that don’t already have that tag, saving clicks and confusion.

A quicker way to keep your events organized and ready for deeper insights.

Accessible using the Add Events to Tag button on the Event Tags page of the Web Dashboard

8. Marketing Tweak: Day0 with Group-Only Galleries ✉️

If a participant’s personal gallery only contains Group Photos, Day0 marketing won’t trigger:

  • Fewer Unnecessary Texts/Emails: Prevents those “here’s your gallery!” messages when there’s not much for them to see yet.
  • Smarter Outreach: Focus your marketing on participants who have individual images waiting.

This slight change can tidy up the user experience for your SportsPics™ or GradPics™ events.

9. Capture App 4.13.71 (iOS Only) 🍏

Some app updates for iPhone/iPad users:

  • iPad UI Fix: Addresses a bug when launching in portrait mode.
  • Photo Booth Mode Backgrounds: Hidden on iPads running iOS < 17.
  • Event Number: Now appears next to the event name, so you’re less likely to shoot under the wrong event.
  • Volume Trigger Fix: The internal camera capture now works again for devices that had issues after recent iOS changes—great news for those using volume-based triggers!

That’s it for this Weekly Recap!

We hope these upgrades help you handle your events faster, deliver better experiences to your clients, and keep the momentum going all year long.

As always, let us know if you have any questions, ideas, or just want to say hi.

Cheers and sparkles,

Candy 🍬

Related articles

Helpful Tips: Using QuicPics at your Proms
QuicPics
April 19, 2023

Helpful Tips: Using QuicPics at your Proms

6
 minutes read

QuicPics is an innovative photo booth alternative designed to enhance the photo-taking experience at events like proms. As a photographer, QuicPics allows you to offer a modern, fun, and interactive experience for prom attendees, while you get paid upfront for your services. It can be sold as a “mobile photo booth” service, as a manned portrait station akin to traditional photo booths, or as a service where you provide both! Thanks to our cloud, no matter how many photographers or photo stations you have, they’ll all talk to each other, meaning guests only have to provide their contact info once. 

This short guide will walk you through how to effectively use QuicPics for a prom night:

  1. First, Understanding QuicPics:
    QuicPics is quite different from NowCandid’s other programs, it texts image files directly to guests in addition to a link to their online gallery. With NowCandid’s other programs, only links to online galleries of images are delivered. QuicPics also charges the photographer for each image they take and upload to the cloud, making it the only NowCandid feature that charges the photographer in any way.
  2. QuicPics’ Advantage:
    QuicPics is a perfect alternative to traditional photo booths. It's a mobile, modern, interactive, and engaging way to capture memories at proms. With instant texting of images to attendees, QuicPics ensures a seamless experience for everyone involved.
  3. Create a Unique Photo Station:
    Make your photo station stand out by offering themed backdrops, fun props, and creative lighting. This will not only draw the prom-goers to your station but also encourage them to share their professional photos on social media, giving you free advertising and potentially attracting new clients.
  4. Pricing and Payment:
    As a photographer, it's essential to get paid upfront for your services. We recommend charging between $200 to $300 per photographer hour, possibly offering a discount if they are requesting a large number of photographers and/or hours. Alternatively, talk to the school or with involved parents about increasing the cost of prom tickets to pay for QuicPics services for the prom. Take payments using PayPal, Square, Venmo, via check, checkout on your own website, or whatever means are most convenient for you! Just ensure it looks professional to the school you’re dealing with.
  5. Planning your Workflow:
    To ensure a smooth process, have a tablet available for prom attendees to interact with the QuicPics platform. This will allow them to receive their photos via text message instantly thanks to the LTE connection of the tablets. We recommend using the Tap-A-Face workflow, which simplifies the process of collecting data and pairing it to their face, as well as being a fun addition to the prom already!
  6. Selling the Service:
    To promote your QuicPics services, create a compelling sales pitch that highlights the benefits of a mobile photo booth experience, the convenience of instant photo sharing, and the interactive nature of the platform. Showcase sample photos and emphasize the unique value QuicPics brings to a prom night.

QuicPics is a fun, interactive, and modern solution to traditional photo booths, making it an excellent addition to any prom night. By following these tips, hopefully you'll be able to provide a memorable experience for prom attendees while securing payment for your services. Happy snapping!

Proms: An Untapped Gold Mine
PartyPics
April 14, 2023

Proms: An Untapped Gold Mine

4
 minutes read

Plenty of photographers think photographing a prom is not worth their time and energy. They're not wrong to think that either... as that can often be the case! But, NowCandid's "PartyPics Now!" program has cracked the code and found a way to consistently monetize proms and other school dances!

We analyzed all the proms that took place in 2022 that had utilized PartyPics Now, and found that across dozens of proms, photographers averaged well over $2 per image taken and about $5 per guest at the prom. Not bad, considering the average number of students at any given prom was about 400 students!

The top performing proms well exceeded $2 per image and $5 per guest by doing some combination of the following things:

          • First, they used NowCandid's Selfie Check-In workflow, which gathered the guest's parent's contact data! Marketing the prom images to them as well.

          • Second, they utilized photo stations (sometimes with backdrops and/or props!) with photographer attendants in addition to roaming photographers.

          • And third, they sent 4 or more photographers to ensure they photographed every guest multiple times, making the guest's online galleries (and the larger photo packages) more appealing!

At proms where all three of those conditions were successfully met, the average sales per image was $3 and the average sales per event guest was almost $9!

So, while proms might not be quite as profitable as they were once upon a time, they can still be a great way to make some extra profit in your off season, expand your business, keep your photographers paid and busy, and more!

And... stay tuned! Because a new feature we're calling Group-by-Face rolls out in the very near future! Helping to take your online galleries for social events to the next level! 🎉

Have any questions? Feel free to contact us! We love to chat. 😃

Stay profitable, photographers! 📸

Cap and Gown Chronicles: Master the Art of Graduation Photography with These Expert Tips
GradPics
April 11, 2023

Cap and Gown Chronicles: Master the Art of Graduation Photography with These Expert Tips

4
 minutes read

Graduation day is a momentous occasion, marking the culmination of years of hard work, dedication, and the occasional all-nighter (we're looking at you, college students). As a photographer, you have the unique opportunity to capture these once-in-a-lifetime moments, and we're here to help you make the most of it. From technical know-how to creative flair, we've got you covered with expert tips for optimal graduation photography. And with NowCandid's Grad Pics Now program at your side, you'll be snapping insta-worthy shots in no time. So, ready your camera and let's get started!

  1. Scout the Location:
    Before the big day, visit the graduation venue to familiarize yourself with the layout and lighting conditions. Identify the best spots for group shots, candid moments, and the all-important diploma handoff. This prep work will ensure that you're in the right place at the right time to capture those precious memories.
  2. Use the Right Gear:
    Bring a telephoto lens for close-ups of the stage, a wide-angle lens for group shots, and a fast prime lens for low-light conditions. A monopod or tripod can also help steady your shots and reduce camera shake during those crucial moments and pre- or post-stage cross portraits.
  3. Find the Perfect Angle:
    Get creative with your angles to add depth and interest to your shots. But importantly, always find the right shot in order to get the graduate’s face in the photo! When using NowCandid’s face matching workflows, that’s a very important piece of the puzzle! When you can’t get a good angle, consider asking the school ahead of time to make sure the “handshaker” will always turn towards the camera and smile, prompting the graduates to do the same!
  4. Tell the Story:
    Graduation day is a rollercoaster of emotions, from anticipation to elation. Document the day's events, capturing candid moments and reactions that tell a compelling story. With NowCandid's Grad Pics Now program, you can easily organize and share these images in a personalized gallery, allowing graduates and their families to relive the day for years to come.
  5. Get Creative with Portraits:
    Graduation portraits don't have to be stiff and formal. Encourage the graduates to express themselves, whether it's a celebratory jump or a quirky pose with their diploma. These fun shots will stand out and make lasting memories.

With these expert tips and NowCandid's Grad Pics Now program in your toolkit, you'll be well-equipped to master the art of graduation photography. So, channel your inner photographer and capture the magic of the big day – because, as Ferris Bueller once said, "Life moves pretty fast. If you don't stop and look around once in a while, you could miss it." And no one wants to miss a moment as special as graduation day. Happy snapping!

Let’s get in touch

If you’re a photographer looking to add NowCandid services to your wheelhouse – set up a call by clicking the button below.

How to customize formatting for each rich text

How to customize formatting for each rich text

How to customize formatting for each rich text

How to customize formatting for each rich text

How to customize formatting for each rich text

What’s a Rich Text element?

The rich text element allows you to create and format headings, paragraphs, blockquotes, images, and video all in one place instead of having to add and format them individually. Just double-click and easily create content.

A rich text element can be used with static or dynamic content. For static content, just drop it into any page and begin editing. For dynamic content, add a rich text field to any collection and then connect a rich text element to that field in the settings panel. Voila!

Headings, paragraphs, blockquotes, figures, images, and figure captions can all be styled after a class is added to the rich text element using the "When inside of" nested selector system.

  • List One
  • List Two
  • List Three
  • List Four
  • List Five

This is a link

This is bold text