HomeNavigation arrowBlogNavigation arrow
Current page
Feature Updates

Big News: Tiered Pricing Returns to NowCandid™! 🎉

Big News: Tiered Pricing Returns to NowCandid™! 🎉
Hello, my wonderful photographers!

Candy here, and I’ve got big news about a feature that might just boost your sales in 2025. Yes, that’s right—Tiered Pricing is making its comeback to NowCandid™!

Let’s dive into the what, why, and how of this exciting development.

Heads Up, Everyone! ⚠️

This is an important one if you’re an active NowCandid™ user. So, if you read only one of our updates this year... let it be this one!

Tiered Pricing will roll out on January 20th, and it’s a big deal for your SportsPics™, PartyPics™, GradPics™, or other sales-driven events. So please keep reading to see what’s new and how it could benefit you.

What Is Tiered Pricing?

Tiered Pricing is the concept that your retail prices will nudge upward in small increments over three separate one-week periods:

  1. Week 1 – “Early bird” pricing
  2. Week 2 – Slightly higher “discounted” pricing
  3. Week 3 – Another small bump, settling at your “regular” pricing

We call it “Tiered Pricing” because each week is its own “Tier.”

We’re not trying to get you to charge outrageous amounts (in fact, lowering your prices can often benefit your overall profit), we're just introducing tiny price increases that the NowCandid™ marketing campaign will reference to gently push people to order more, and sooner.

The Real Advantage Lies in the Marketing

Some might assume Tiered Pricing is about making money off late buyers, but that’s not our aim:

  • Minimal Price Increases:

    A $1 or $2 difference won’t significantly affect your overall pricing but creates a sense of urgency in your marketing.
  • Deadlines & Discounts:
    • Week 1: Promoted as “early bird.”
    • Week 2: Positioned as “slightly higher but still discounted.”
    • Week 3: Called “regular” or “final” pricing.
  • No Negative Reinforcement:
    • There are no hefty late fees. Buyers see a small difference in price from one week to the next, which spurs action without scaring them off.

This structure keeps your clients engaged, draws in earlier purchases, and still ensures a reasonable price for those who come back later.

Remembering Tiered Pricing from the Past 🏛️

  • Before the New Dashboard:

    In mid-2024, when we introduced our modern Web Dashboard & new retail site, we chose to keep pricing straightforward at first—no Tiered Pricing.
  • Old Premade Offers:

    Back in the day, NowCandid™ used default “Tiered” premade offers with subtle $1–$2 increases each week. These small bumps proved beneficial enough that we’re ready to bring them back with the new system.

Why Such Tiny Price Increases? 🤏

NowCandid™ fosters long-term, residual sales through:

  • Annual Marketing Reminders
  • Event History (for customers who log into the retail site)
  • “Buy More” QR Codes on Prints
  • Our Find Me Portal
  • And future expansions that will encourage reorders!

By raising prices too steeply in the final weeks, you risk losing those valuable residual buyers. Tiny increments let the marketing do the heavy lifting—highlighting deadlines without truly punishing anyone for missing Week 1 or 2.

Why Bring Tiered Pricing Back Now? 📈

We studied a large batch of graduation Events, comparing the performance of schools photographed in both 2018 and 2023 (avoiding COVID years in the middle).

Between these two rounds of graduations, we made many improvements, but one of the bigger changes was the addition of Tiered Pricing.

Importantly, in 2023, Sales per person photographed increased by 76% over 2018.

Even if Tiered Pricing accounted for just one-fifth of that boost, that’s still a 15% jump in your own sales.

So while it might not be the only factor, it’s likely to be a meaningful one.

How We’re Implementing Tiered Pricing 🚀

We want to keep NowCandid™ easy to use, so Tiered Pricing will be made active for all sales-driven events (SportsPics™, PartyPics™, GradPics™, Portraits, etc.) starting January 20th, without a special toggle to turn it off—for now. Here’s the plan:

  1. New Tabs Accompanying Each Product & Package in the Offer Creator
    • Week 1 (base price)
    • Week 2 (+$1 on individual items, +$2 on packages)
    • Week 3 (+$2 on individual items, +$4 on packages compared to Week 1).
  2. Marketing Alignment
    • NowCandid™ marketing texts and emails will be altered to automatically reference these price bumps each week, nudging people to purchase before they miss the “discounted” or “early bird” phase.
  3. Your Current Prices Will Become Week 1 Prices
    • If you want your current price to remain the “Week 2” rate, consider lowering your Week 1 by $1 or $2. That way, you’re effectively offering a genuine discount in Week 1 while still matching your usual rate in Week 2, with only a slight increase in Week 3.
  4. What About QuicPics™ or QuicPics GO™?
    • Tiered Pricing won’t apply to those event types, since they focus on free downloads and don’t rely on persistent marketing. This only affects events where you’re selling items at retail prices over multiple weeks.

Participant vs. Event-Based Timing ⏱️

  • Participant Timing:

    Tiered Pricing for a specific subject starts when their “Day 0” marketing text goes out—i.e., once they become a participant in your Face Matching or Positive ID event. If someone isn’t photographed until Day 3, they’ll still get a full Week 1 period from that day forward.
  • All Images Gallery:

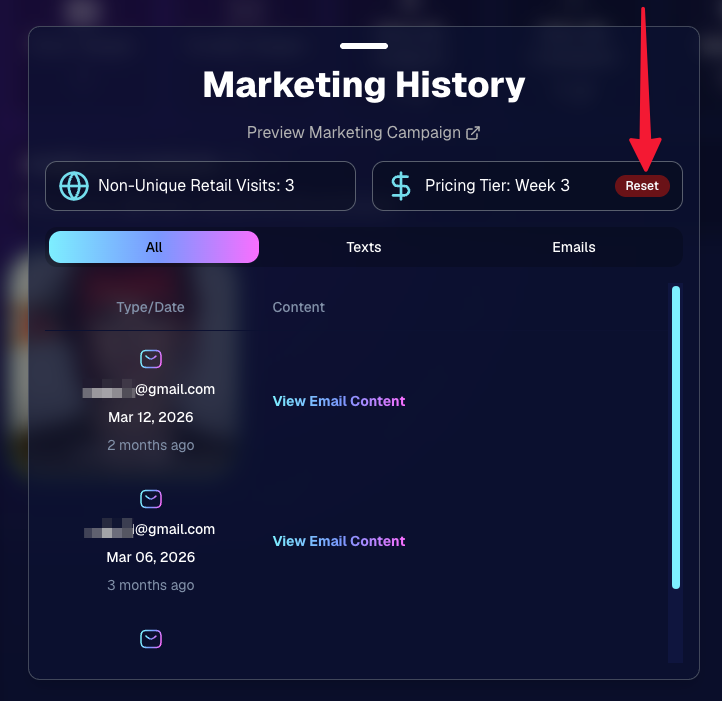
    If a customer bypasses personal galleries and shops the All Images Gallery on the NowCandid™ retail site, the Price Tier they see is based on the Event’s official start date.
  • Dashboard Insight:

    You can see which pricing Week a participant is currently in by viewing their Participant Details page on the Web Dashboard.

What Do I Have to Do? 🤔

  • If You’re Fine With Default:

    Sit back and let NowCandid™ handle it! We’ll roll out the changes automatically on January 20th.
  • If You Want a Lower “Week 1”:

    Adjust your existing Offer prices downward for that first Tier, making your Week 2 and Week 3 prices align with what you used to charge

    If you want your current price to remain the “Week 2” rate, consider lowering your Week 1 by $1 or $2. That way, you’re effectively offering a genuine discount in Week 1 while still matching your usual rate in Week 2, with only a slight increase in Week 3.
  • Feedback Welcome:

    If you truly dislike Tiered Pricing or think it messes up your strategy, reach out. We’re open to suggestions for making it optional, though for now it’s set to be standard across sales-driven events.

That’s the scoop, my lovely photographers!

Tiered Pricing is coming back to NowCandid™, and we believe it can add a gentle lift to your sales without complicating your life.

If you have questions or concerns, don’t hesitate to let us know. Otherwise, mark your calendar for January 20th and watch those early-bird sales roll in!

Candy 🍬

Related articles

Weekly Recap: Profile Logos, Faster Packages, and a Revamped Event Management Portal
Feature Updates
April 17, 2026

Weekly Recap: Profile Logos, Faster Packages, and a Revamped Event Management Portal

5
 minutes read

Hey photo friends! 👋

This week’s updates are all about cleaner branding, smoother selling, and better visibility across your workflows—from a new profile/business logo system to big package configurator performance improvements, plus a long-awaited refresh of the Event Management Portal (EMP) ahead of grad season.

Let’s jump in. 💫

🖥️ Dashboard Updates

📣 Client Outreach: Texts now require a URL

Client Outreach SMS messages now require a URL to be included—helping ensure every text has a clear destination and call-to-action.

🧾 Reports: “Participants” terminology restored for accuracy

The Events Report, Compare Report, and Faces Report now use Participants instead of Contacts.
Reminder: a Contact is someone with info; a Participant is a contact with at least one image in their gallery. This avoids deflating stats with unmarketable contacts.

🧰 Candy Culler usability win

  • Added a Download Image button to the Image Details lightbox on the Candy Culler page.

🖼️ Better controls in Participant lightboxes

  • Added a visibility toggle to the Image Details lightbox on the Participant Details page.

🔍 New Event List filters

The Event List page now includes quick filters for:

  • Background Removal events
  • JerseyJotter events
  • Candy Culler events

🖼️ Offer background minimum lowered

You can now set your Offer background selection minimum to 5 (previously 20).

🚚 New flat-rate shipping option

Added $2.50 flat-rate shipping as an available shipping option.

📱 Mobile Dashboard

  • Fixed an issue where Friday weekly sales notifications were not sending.

🏷️ New: Profile / Business Logos (Branding Upgrade)

You can now assign a business/profile logo—upload to your profile icon on the dashboard as a 650×650 image and automatically cropped to a circle.

Where it appears:

  • Dashboard profile page + navigation
  • Retail contact popup above your business name
  • Receipt emails, web receipt preview, and the web receipt download page
  • Event Management Portal (EMP) header beside your business name
  • Private Image Download Gallery (PIDG) header
  • Public Event Tag List page header

More placements are planned in the future—this is the first step toward a more consistent, professional brand presence everywhere your customers interact with you.

🏷️ Event Tag List Page

  • Improved UI for a cleaner, easier experience.

🔒 Private Image Download Gallery (PIDG)

  • Improved UI
  • Added a note to the landing popup regarding released images

🛍️ Retail Improvements (Big Week for Packages + Rendering)

🖼️ Captions render earlier for key products

Graduation Plaque and Titled Luxe Prints now render custom captions earlier in the process, rather than waiting until the captions step.

📦 Package configurator upgrades

The package configurator received several improvements:

  • Added pagination to the All Gallery tab in the “Next Package Item Image Picker” step
  • Added a “Discard package progress?” popup when backing out after configuring at least one item to prevent accidental loss of progress
  • Fixed an edge-case crash on mobile when configuring large packages in offers with 3D items
  • Overall package configurating is now much more performant

🧩 Z-Crop improvements

Several improvements were made to ZCrop images to improve behavior and consistency.

🏷️ Group photo refresh fix

Fixed user-added dynamic gallery group photos showing as not group after refresh.

🎨 Background order consistency

Custom offer background order now matches the order in the offer details editor—drag and drop reordering on the dashboard offer editor.

📸 Capture App (iOS & Android OTA): 5.4.3 + 5.4.4

  • 5.4.3: Fixed a crash when toggling a Group Photo without any service
  • 5.4.4: Fixed a keypad popup issue on very large screens (like 13” iPad) where opt-in/cancel buttons were being cropped out

🧾 Event Management Portal (EMP) — Major Refresh (quic.pics/portal)

Quick reminder: the Event Management Portal (EMP) is a mini-dashboard on quic.pics that uses the Capture App login—so you can do “dashboard-like” tasks without downloading an app or using a full account login. It hasn’t been talked about much lately, but this week it got a big refresh in preparation for grad season.

What’s new:

  • Improved security
  • Tons of UI changes and a new dark-only theme
  • Event list page now includes a search bar
  • Event list page updated to “Live on Capture App” (instead of “Active”)
  • Event list page shows attributes like the main Dashboard + adds an Event Number column
  • Header now shows business name and logo
  • Fixed a crash on the Marketing History page
  • Added text/email filter on Marketing History
  • Images now use lightboxes with arrow key navigation
  • Participant Details now shows Additional Contacts
  • Participant Details now shows Invisible images

That’s the week! 💫

Between profile/business logos, a smoother package configurator, better report accuracy, and the EMP glow-up for grad season, this update should help you move faster, look more professional, and reduce friction across the whole customer experience.

Keep creating magic,
— The NowCandid Team 🍬

Weekly Recap: Titled Luxe Prints, Zoom Cropping, and Candy Image Studio “From Scratch”
Feature Updates
April 10, 2026

Weekly Recap: Titled Luxe Prints, Zoom Cropping, and Candy Image Studio “From Scratch”

5
 minutes read
Hey photo friends! 👋

This week’s updates are a fun mix of new products, new visual workflows, and small-but-important fixes that make day-to-day work smoother—especially across Candy Image Studio, retail packages, and PhotoRoster/PhotoTag downloads.

Let’s jump in. ✨

📣 Dashboard: Client Outreach + Workflow Quality-of-Life

Client Outreach email history is easier to use and more reliable:

  • Added a “View” button in Client Outreach email history so you can open the sent email in a new tab (similar to how order receipts work).
  • Fixed an issue where email status didn’t always show for all emails in the status list.

More clarity when reviewing participant galleries:

  • The Participant Details page now shows invisible images, clearly marked in red with an “Invisible” label—so you can understand what’s hidden without guessing.

PhotoTag participant gallery downloads got safer:

  • Fixed PhotoTag participant gallery downloads overwriting images when multiple files shared the same frame.
  • Fixed the download count displayed on the download button being off.

🎨 Candy Image Studio: Create Without an Input + A New Node

Candy Image Studio has two notable upgrades this week:

🧠 No input image required (generate from scratch!)
Candy Image Studio no longer requires an input image to get started. You can generate from scratch using the “From Scratch” node (at the very bottom), or by starting from custom text or a custom image—great for things like creating portrait backgrounds or creative assets.

🆕 New “Bobblehead” node
A brand-new Bobblehead node is now available inside Candy Image Studio.

Disclaimer: This is not a new product. This is an image node in the Candy Image Studio.

🏈 Jersey Jotter + Event Settings Cleanup

Jersey Jotter settings were removed from the Create/Edit Event popup.
Since Jersey Jotter now has its own dedicated page, we pulled those settings out of the event popups to keep Create Event as minimal (and fast) as possible—and keep Edit Event aligned with Create.

New: “Auto Enhance” can be turned off in Create/Edit Event.
Important clarity here:

  • Auto Enhance isn’t new — it has always been enabled by default.
  • What’s new is the ability to turn it off from the Create/Edit Event popup.
  • It’s labeled “Auto Enhance” (not “Retail Enhancement”) because it affects more than retail, including things like LiveLoop, Dashboard previews, Shareable Download Gallery, and more.
  • Note: this setting only impacts images uploaded after you change it. (So anything already uploaded keeps whatever enhancement state it had at upload time.)

🛍️ Retail: Package Backgrounds + Fixes

A few retail improvements landed to reduce confusing edge cases:

  • When selecting a PNG (without a faux background render) during the “Next Package Item Image Picker” step, the chosen background will now default to the first background in the background picker list (instead of the purple default).
  • Fixed an issue where the background selector step didn’t always appear for non-faux BGR images.
  • Fixed a crash related to having Wall Clings in packages.
  • Updated the Free Download description to: “Free simple, full-resolution download of your image.” (Previously it implied lower resolution.)

🔍 NEW: Zoom Cropping “Z-Cropping” (Dashboard + Retail)

In Advanced Offer Settings, you can now enable Zoom Cropping, which automatically adds an additional image into the customer’s gallery that is zoom-cropped toward their face.

Details & rules:

  • ✅ Works on Face Matching Events
  • ✅ Works only on images with one face
  • ✅ All default graduation offers/price levels now have Zoom Cropping enabled
  • Behind the scenes, it applies a ~30% zoom toward the face, with an additional ~30% pull from the center of the image toward the face (clamped to avoid cropping beyond image bounds)

This is a great “quiet upgrade” for grads and portrait-style moments where customers love a tighter crop—without you needing to manually create it.

🖼️ New Products: Titled Luxe Prints (Dashboard + Retail)

Two new products just landed:

  • 5×7 Titled Luxe Print
  • 8×10 Titled Luxe Print

Want to see the 3D preview?
https://app.nowcandid.com/3d/titled-luxe-print

New: “Edit Titled Luxe Print” Page (per event)
There’s a new event-level page available in the Dashboard sidebar only if one of the new titled products is included in the event’s offer. From there, you can:

  • Set default captions
  • Select left/right logos
  • Preview the 3D render
  • (Easter egg: rotate the render and you can spot your business name on the backprinting.)

Notes:

  • Default captions and logos are optional
  • Retail shoppers can change captions when ordering
  • Logo requirements: upload/import a 650×650 transparent PNG
  • Retail supports both 2D + 3D renders, including your custom logos
  • Order Details pages now display the selected logos, similar to how we show captions and colors

That’s the week! 💫

Between Zoom Cropping, Titled Luxe Prints, and Candy Image Studio’s new From Scratch flow (plus a pile of cleanup across retail + downloads), this update adds a lot of power without adding extra complexity.

Keep creating magic,
— Candy 🍬

Big News: Introducing Client Outreach 🚀📣
Feature Updates
April 3, 2026

Big News: Introducing Client Outreach 🚀📣

6
 minutes read
Hey photo friends! 👋

This is a big one.

We’re excited to introduce Client Outreach — a brand-new tool that lets you reach your customers directly with one-off texts and emails, completely separate from your normal event marketing.

Whether you’re following up after an event, promoting future bookings, or nudging people who missed check-in… this gives you a simple, flexible way to stay connected.

Let’s break it down 👇

📣 What is Client Outreach?

Client Outreach lets you:

📩 Send one-off emails and texts

👥 Build contact lists from:

  • Existing events
  • Uploaded spreadsheets
  • Or both combined

🎯 Filter contacts based on:

  • Contacts with matched images
  • Contacts without matched images
  • Or everyone

This is not automated campaign messaging — it’s intentional, targeted outreach when you need it.

👥 Build Your Audience, Your Way

When creating an outreach list, you’ve got flexibility:

  • Pull contacts from one event, multiple events, or none
  • Upload your own spreadsheet of contacts
  • Combine both sources into one list

And when using events, you can choose:

  • Only people with images
  • Only people without images
  • Or everyone

That opens the door to some really useful workflows (more on that below 👀).

💬 SMS Outreach (Simple & Familiar)

Sending texts is designed to feel easy and familiar.

🧾 Uses a QuicPics-style editor + preview

✍️ Write your message and send to your list

🔗 Include links (galleries, check-in, etc.)

💸 Pricing:

$0.01 per segment, per text

A segment is roughly:

  • ~140 characters (standard text)
  • ~65 characters (if using emojis)

Longer messages may use multiple segments (typically 2–4).

📧 Email Outreach (Powered by Candy 🤖)

This is where things get really fun.

Instead of building emails manually…

👉 You just describe what you want, and Candy builds the email for you.

✨ How it works:

Tell Candy things like:

  • What the email should say
  • What tone you want (fun, professional, urgent, etc.)
  • What your call-to-action button should say
  • Where that button should link

Candy will:

✍️ Write the email

🎨 Design the layout

🧠 Generate a subject line

🏷️ Pull in your business info automatically

No HTML. No formatting headaches. Just describe it.

🧠 Even Smarter with Events

Every outreach must be tied to an event (for billing/history), but that unlocks some extra power:

If your outreach is related to that event, Candy can pull in things like:

🔗 Check-in links

🖼️ Cover photos

🖼️ Gallery links

And more!

👉 You can still override this and use your own URLs — Candy will follow your instructions.

📬 Sending Details

Emails are sent from:
your-business-name@quic.pics

Your business name is prominently shown in the inbox

You can edit the subject line Candy generates before sending

💸 Email Pricing

$0.01 per 10 emails (rounded up)

Examples:

  • 10 emails = $0.01
  • 11–19 emails = $0.02

🖼️ Bonus Tip: Include Images in Emails

If you have direct image URLs, you can give them to Candy and ask her to include them in the email.

Not sure how to get those? Google is your friend on this one 😄

📊 Track Performance

Just like order receipts, you can see:

👀 Opens

🖱️ Clicks

❌ Bounces

So you know what’s working.

💡 Real-World Use Cases

Here are just a few ideas:

📸 Catch Missed Check-Ins

Send a Selfie Check-In link after an event using a roster from a school or organizer.

📅 Promote Future Events

Reach past customers and say:
“Hey, we’re photographing again next week!”

🏈 Action Sports Galleries

Send All Images Gallery links when using Jersey Jotter (where face matching isn’t ideal).

🧑‍🤝‍🧑 New Group Photos Added

Let people know:
“Your group photos are now live!”

📝 Post-Event Surveys

Send feedback forms to improve your next event.

🔔 Picture Day Reminders

Get ahead of the event with reminders to increase participation.

And that’s just scratching the surface.

🎯 Simple, Flexible, Powerful

Client Outreach is designed to be:

✅ Easy to use

🎯 Highly targeted

🔄 Flexible for different workflows

💸 Cost-effective

You’re in control of when, who, and what you send.

This is one of those tools that grows with you — whether you’re running small events or large-scale operations.

We can’t wait to see how you use it! 👀

More soon,

Candy 🍬

Let’s get in touch

If you’re a photographer looking to add NowCandid services to your wheelhouse – set up a call by clicking the button below.

How to customize formatting for each rich text

How to customize formatting for each rich text

How to customize formatting for each rich text

How to customize formatting for each rich text

How to customize formatting for each rich text

What’s a Rich Text element?

The rich text element allows you to create and format headings, paragraphs, blockquotes, images, and video all in one place instead of having to add and format them individually. Just double-click and easily create content.

A rich text element can be used with static or dynamic content. For static content, just drop it into any page and begin editing. For dynamic content, add a rich text field to any collection and then connect a rich text element to that field in the settings panel. Voila!

Headings, paragraphs, blockquotes, figures, images, and figure captions can all be styled after a class is added to the rich text element using the "When inside of" nested selector system.

  • List One
  • List Two
  • List Three
  • List Four
  • List Five

This is a link

This is bold text