HomeNavigation arrowBlogNavigation arrow
Current page
Feature Updates

Introducing Virtual Group Builder: Create Virtual Group Photos Faster in NowCandid ✨

Introducing Virtual Group Builder: Create Virtual Group Photos Faster in NowCandid ✨
Virtual group photos can be incredibly valuable for photographers — but let’s be honest, they have not always been incredibly fun to make!

Traditionally, creating a virtual group means jumping between multiple tools. You photograph each subject, create cutouts, export files, open design software, place everyone manually, resize and align the group, add names, save the finished image, upload it somewhere else, and then reconnect that image to the right customers.

That is a lot of steps for one group photo!

NowCandid’s Virtual Group Builder makes the process much simpler. Photographers can now create polished virtual group images directly inside the NowCandid Dashboard using the same Participants, cutouts, PhotoTags, backgrounds, and Event data already connected to their Event.

It is fast, flexible, and built to help photographers get virtual groups online and ready to sell with far less hassle. 🎉

A New Way to Build Virtual Group Photos

Virtual Group Builder is designed for photographers who want to offer professional group images when a traditional in-person group photo isn't possible.

That makes it especially useful for sports teams, schools, dance groups, cheer teams, clubs, all-star teams, and any Event where people are photographed individually but still need to appear together in a final group image.

Instead of needing every participant posed together at the exact same time, photographers can build a finished group photo from individual background-removed cutouts. If someone was photographed later, added after the fact, or missed the original group setup, they can still be included.

That flexibility can be a big deal for volume photography.

Built Directly Into the NowCandid Dashboard

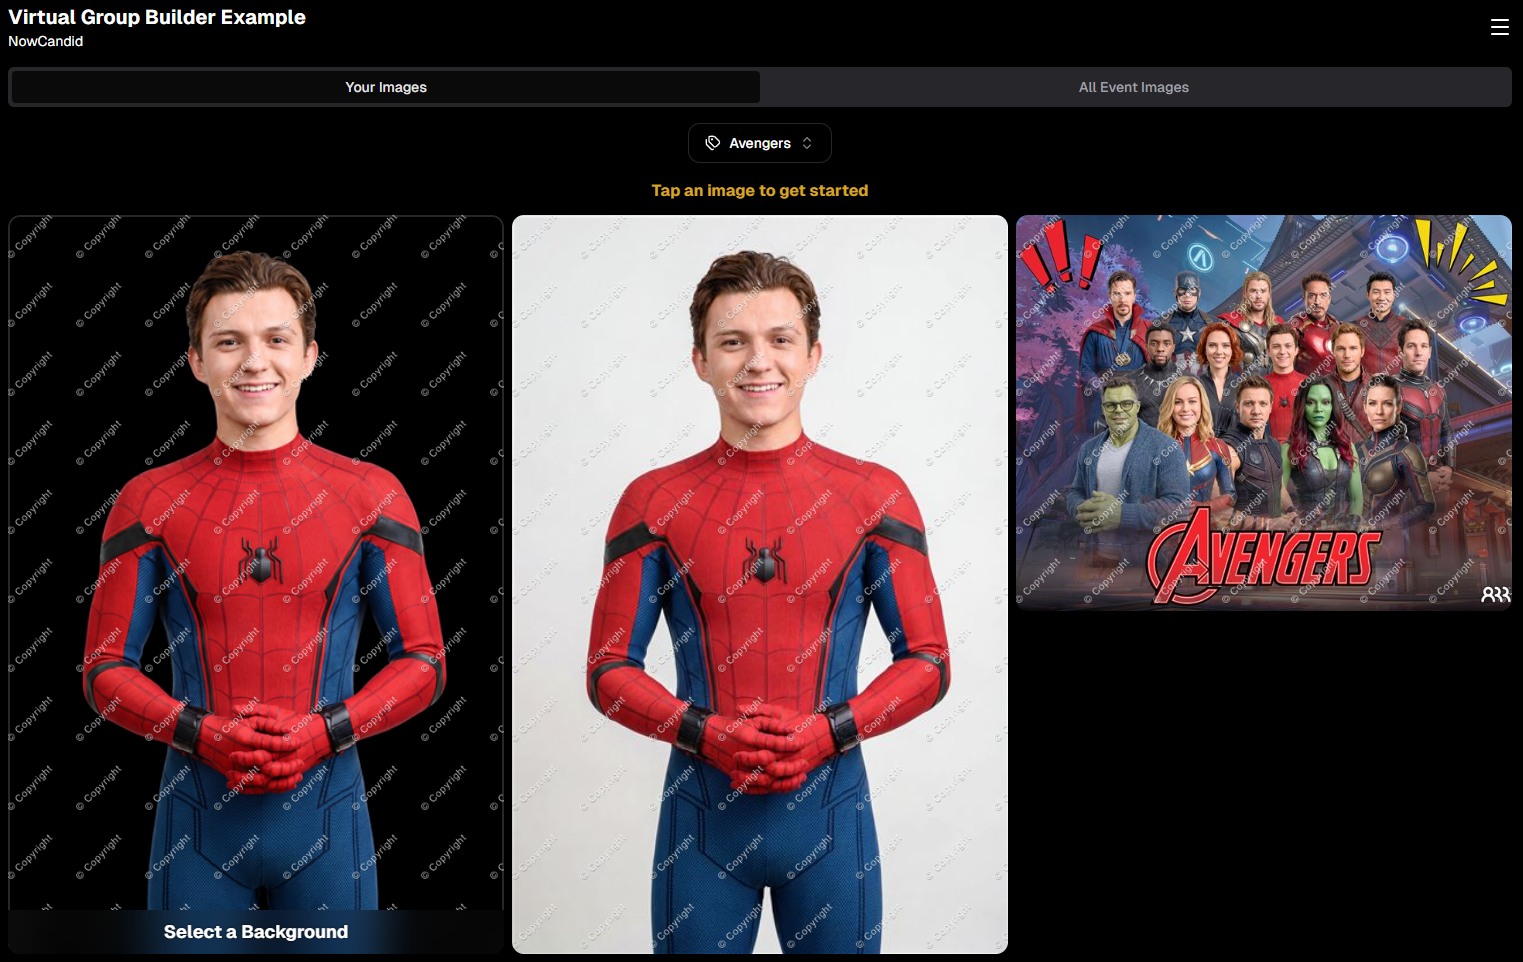
Virtual Group Builder lives directly inside NowCandid. From an Event page, photographers can click Virtual Groups in the sidebar menu and start building using the Event data they already have.

The builder is not a disconnected design tool. It works alongside our existing tools, including participant data, PhotoTags, background removal, cutouts, custom backgrounds, overlays, logos, and everything else.

So instead of downloading files from one place, designing in another, and uploading it back to the dashboard afterward, photographers can keep the process inside NowCandid from start to finish.

Virtual Group Builder also supports the Mobile Dashboard! We don't necessarily recommend making Virtual Groups on your phone - but hey, could be nice in a pinch!

From Capture to Cutouts to Finished Group 🚀

Virtual Group Builder pairs especially well with NowCandid’s live-uploading and background removal capabilities.

A photographer can shoot participants individually, upload images to NowCandid live (or after the event) use NowCandid’s background removal to create clean cutouts, and then bring those cutouts straight into the Virtual Group Builder.

As a quick note for those unfamiliar with NowCandid's background removal, those same cutouts can also be used for shopping with alternate backgrounds! Making them multi-purpose across the Event.

For photographers shooting sports, schools, dance, cheer, or other volume Events, this can save a serious amount of time.

Add the Right Subjects Quickly 👥

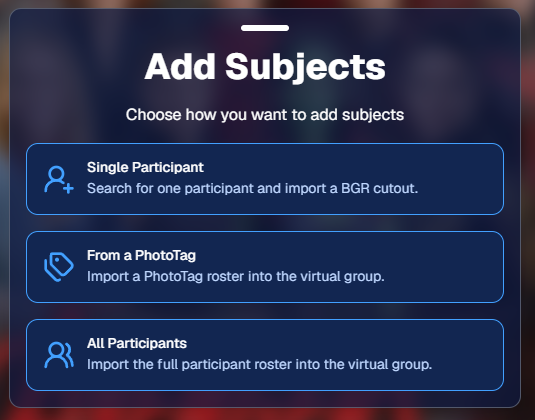
Virtual Group Builder gives photographers a few easy ways to add people to a group.

You can add one participant at a time, import everyone from a specific PhotoTag, or bring in all participants from the Event. This makes the builder flexible for both small custom groups and larger team or event-wide composites.

PhotoTags are especially powerful here. If your Event is organized by team, class, club, etc., you can use those PhotoTags to bring the right people into the group quickly.

For example, a sports photographer could import a single team. A school photographer could import a club or activity group. A graduation photographer could import participants from a specific ceremony.

Clean PhotoTags can turn what used to be a very manual process into just a few clicks. ✨

Helpful Safeguards for Missing Cutouts

Real-world events are messy. Sometimes a participant is missing a cutout. Sometimes a placeholder exists. Sometimes a photographer needs to know what is missing before moving forward.

Virtual Group Builder helps make that easier to catch.

When importing from a PhotoTag, photographers can see the participants in that PhotoTag before removing empty subjects. The Remove Empty Subjects option can remove participants with no cutouts as well as placeholders, but the workflow is designed to help photographers notice missing kids, players, or participants before finalizing the group.

That way, the tool keeps things fast without overlooking potential issues.

Smart Subject Ordering

Virtual Group Builder uses a practical ordering system to help preserve the order participants were photographed in.

Subjects are initially ordered from bottom left to top right based on the alphanumeric order of the first PNG filename. In plain English: if a photographer shoots and names files in a meaningful order, the builder can use that order as a helpful starting point.

This can be useful for sports teams photographed by jersey number, students photographed alphabetically, or groups photographed in a specific roster order.

And when the order needs to change, photographers can simply drag subjects into place.

Drag, Drop, Swap, and Adjust 🖱️

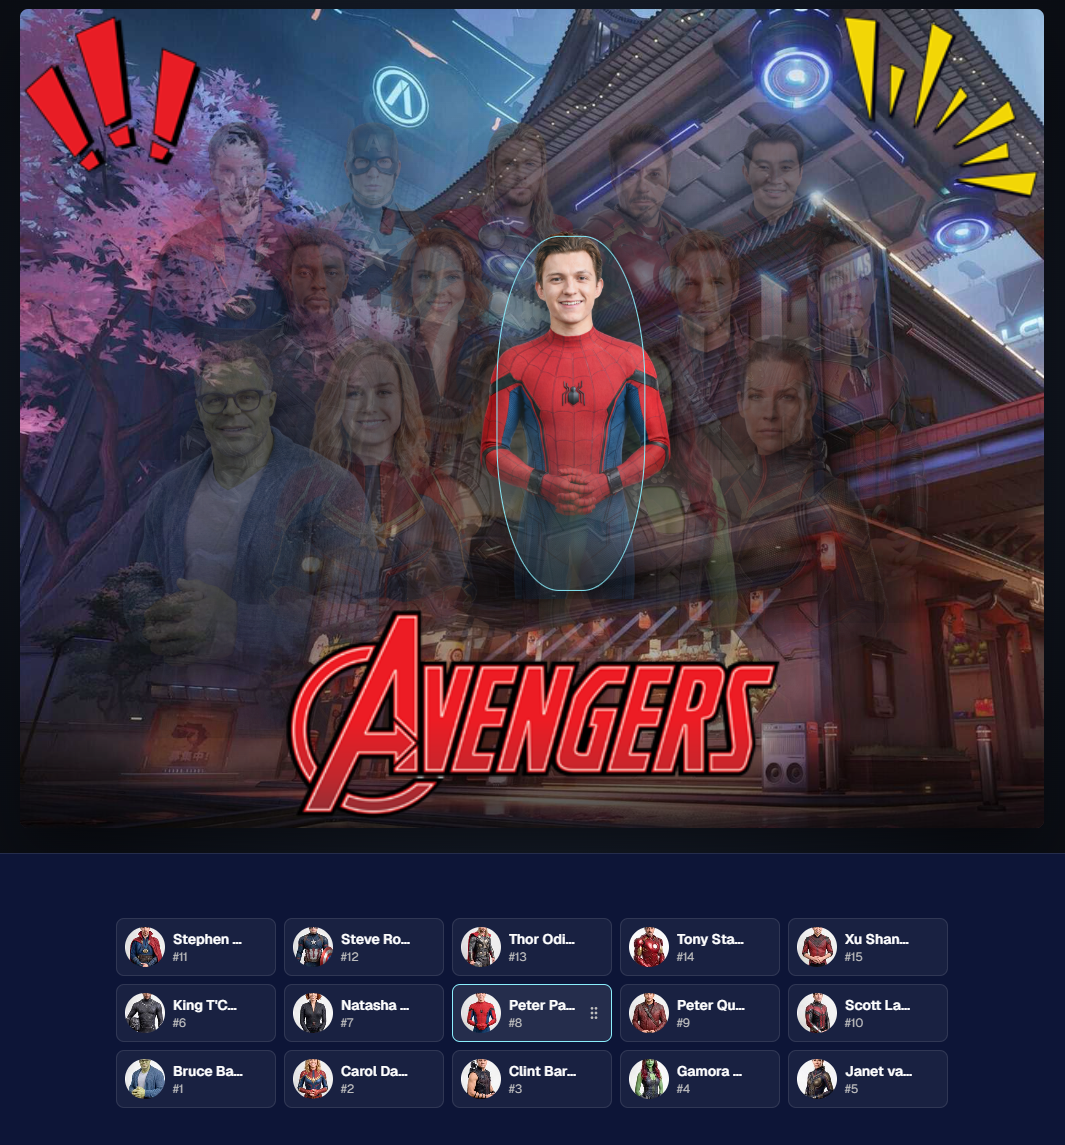
Reordering subjects is simple. Photographers can drag the cutouts directly on the group image or drag the subject tiles at the bottom of the page.

When a subject is dragged to a new location, it swaps with the destination Participant. This makes it easy to balance rows, adjust lineups, or move specific people into better positions.

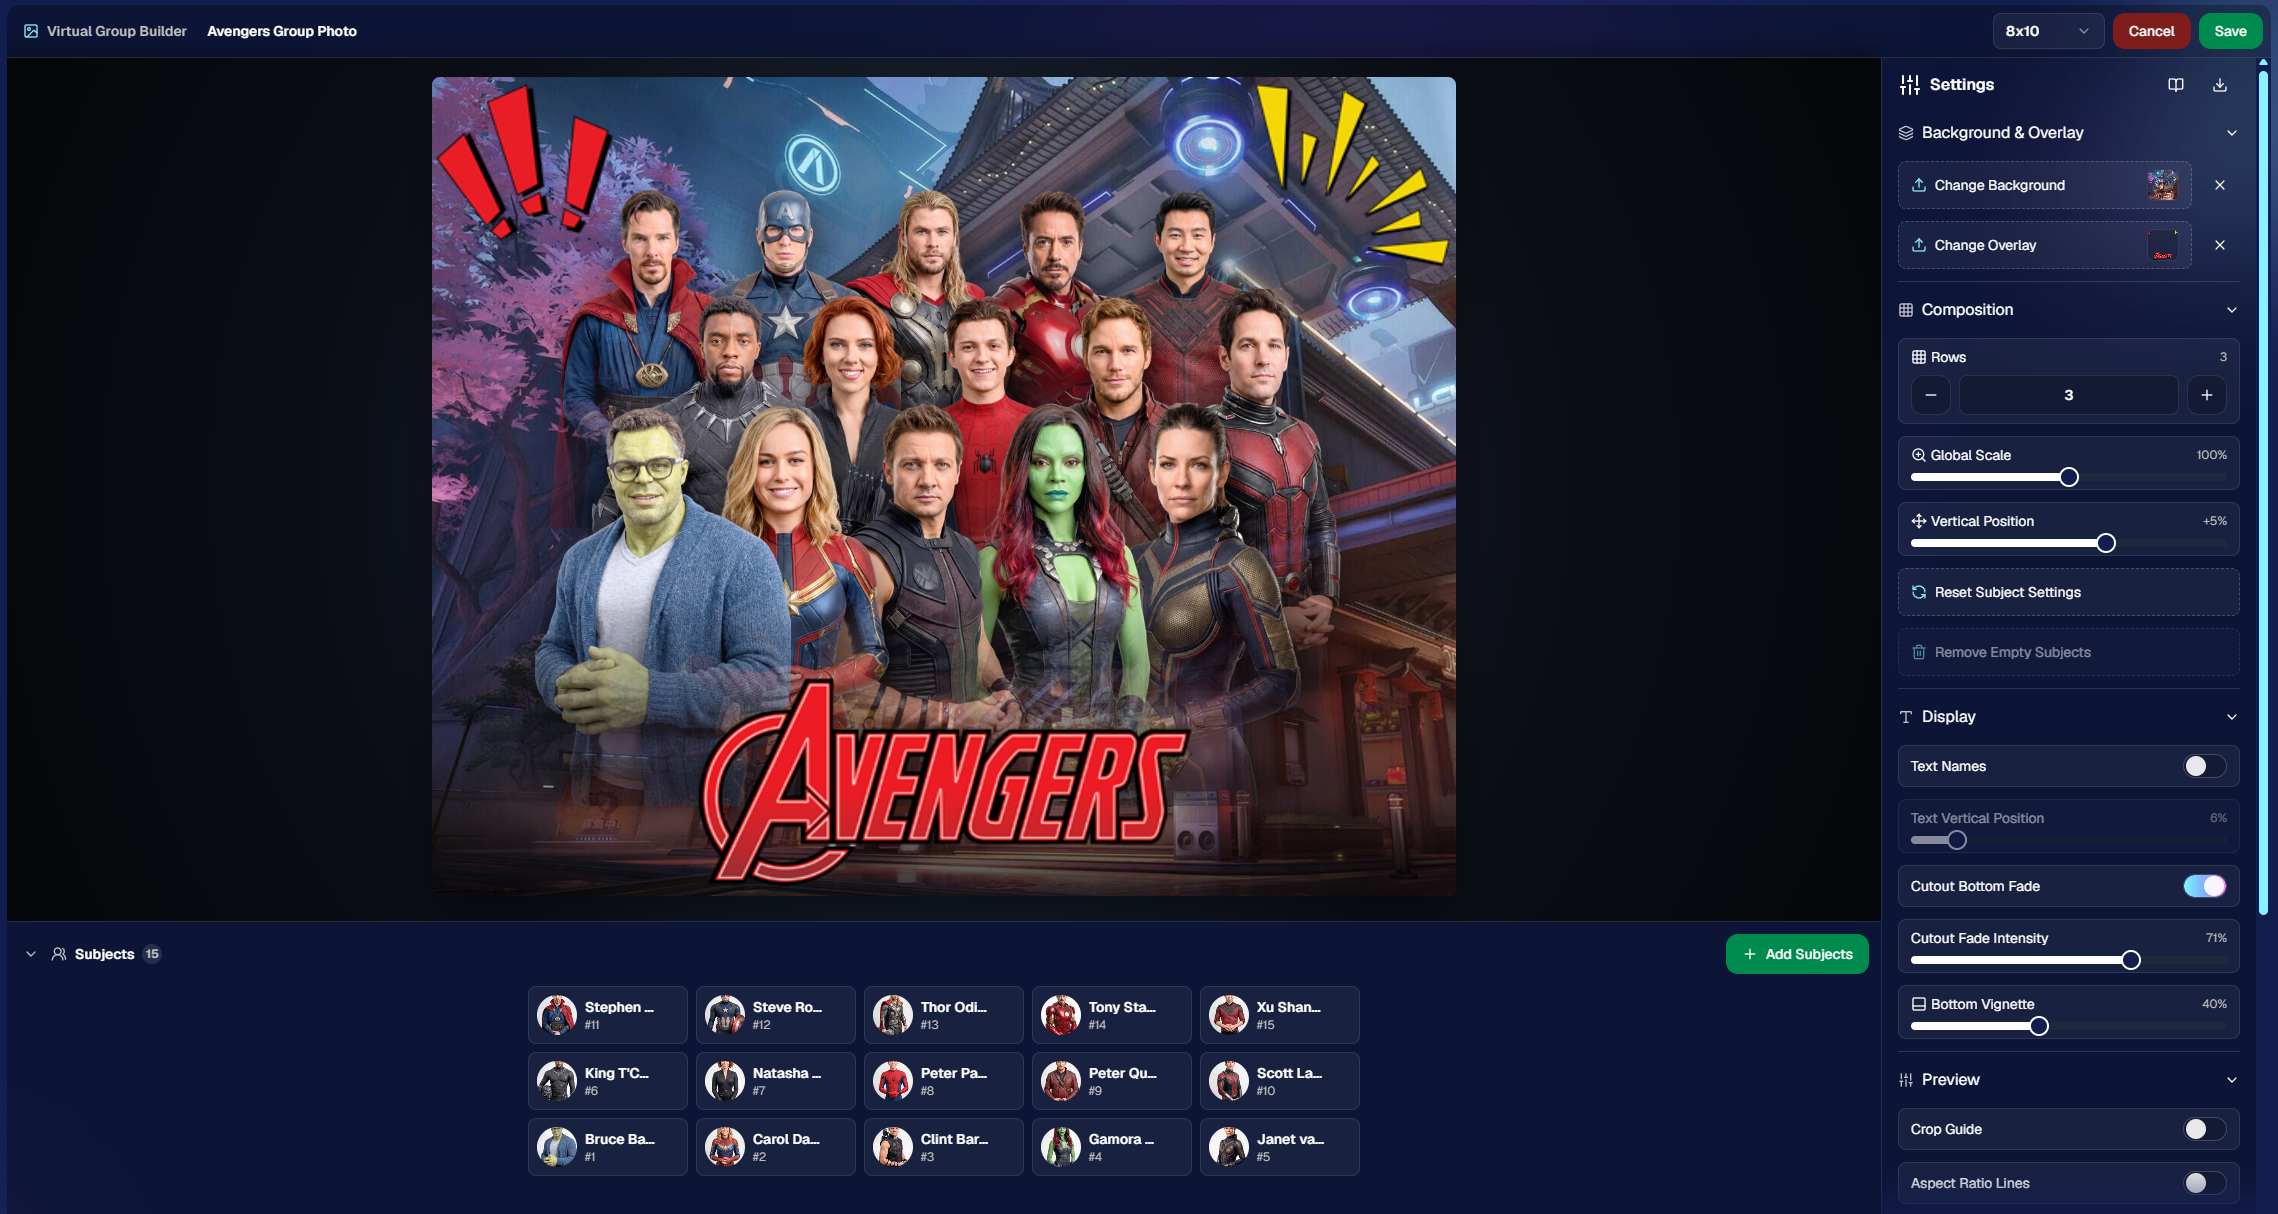
The builder also includes group-level controls for layout and composition, including rows, global scale, vertical position, background, overlay, text names, crop guides, aspect ratio lines, bottom vignette, and cutout fade settings.

These controls help photographers quickly shape the whole group while still keeping the workflow approachable.

Fine-Tune Individual Subjects 🎛️

Sometimes one participant needs a small adjustment. Maybe they need to be slightly larger, shifted left or right, brightened, or swapped to a different PNG.

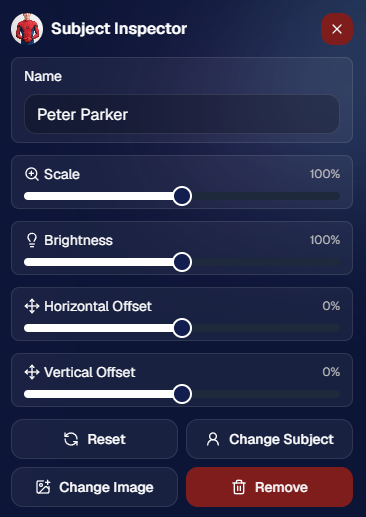
The Subject Inspector gives photographers individual control over each subject.

Photographers can adjust a subject’s name, scale, brightness, horizontal offset, and vertical offset. They can also reset the subject, change them to a different Participant, change the selected cutout, or remove the subject from the group entirely.

This is one of the biggest advantages of the builder: it is fast, but still gives you control when the final image needs a little extra polish.

Choose the Best Cutout for Each Participant 🖼️

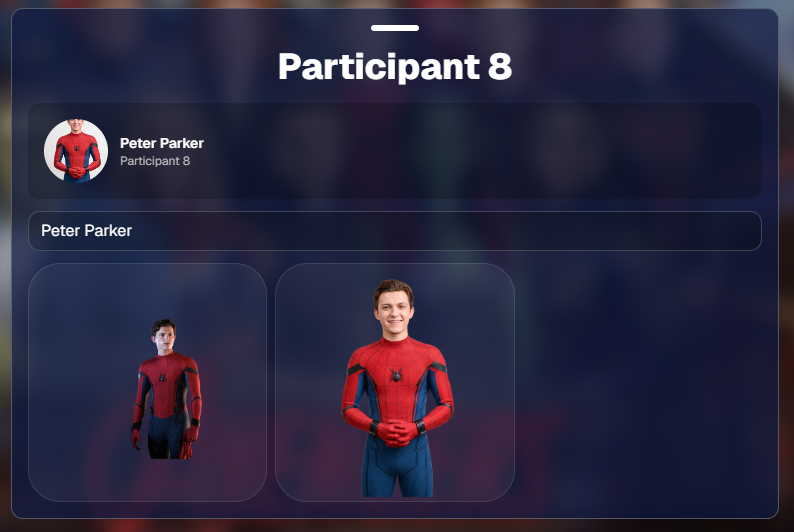
If a Participant has multiple cutouts available, photographers can choose which image works best for the group.

When adding subjects, photographers can also decide they want their incoming Participants to be using their first PNG or their latest PNG (alphanumerically determined using Folder Name and Image File Name).

Then subjects can also be selected to have their individual portrait swapped to a different one! This can be helpful when you want a variety of poses in your Virtual Group, or simply to swap a blinking kid's image to a

Backgrounds, Overlays, Logos, and Product Sizes 🎨

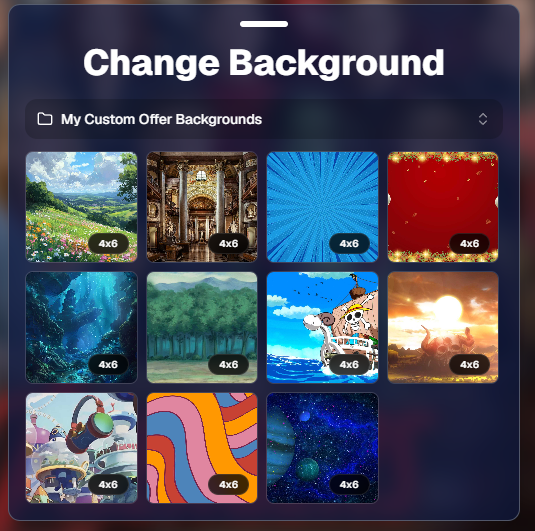
Virtual Group Builder gives photographers creative control over the final image.

Photographers can choose from NowCandid default backgrounds, use custom offer backgrounds, upload their own backgrounds, add overlays, and place account logos in the corners. This makes it easy to create anything from a clean traditional group image to a bold sports graphic or school-branded composite.

The builder supports common product-friendly formats, including 4×6, 5×7, 8×10, and 11×14. Crop guides and aspect ratio lines help photographers preview how the final image will fit the selected size.

There are also display options for subject names, including toggling names on or off and adjusting their vertical position. For teams, senior groups, school clubs, all-star rosters, or small graduation groups, names can make the final product feel more complete and commemorative.

Upload the Finished Group Back to the Event 📤

Once the virtual group is finished, photographers can save it and upload it back to the Event.

During upload, the group image can be assigned to a PhotoTag. This does two important things: it automatically shows the group image to participants with that same PhotoTag, and it makes the group photo searchable in the Event using that PhotoTag.

So if a photographer creates a group image for “Varsity Football,” they can assign it to that PhotoTag on upload. The image can then appear for the right participants and stay organized inside the Event.

That keeps the final product connected to the same Event structure used to build it.

Why This Is Such a Big Deal for Photographers

Virtual Group Builder is more than a design feature. It is a faster, more connected way to create and sell group photography products.

It helps photographers reduce manual design work, use the cutouts they already have, build from PhotoTags and participant data, add missing participants more easily, and get virtual group products online faster.

For volume photographers, that can mean less time spent assembling files and more time selling finished products. For customers, it means more group photo options. For events, it means group photography becomes more flexible, forgiving, and scalable.

Virtual Groups, Now Built Into the NowCandid Workflow ✨

Virtual Group Builder brings together live uploading, background removal, participant cutouts, PhotoTags, drag-and-drop group building, backgrounds, overlays, logos, subject names, crop previews, PhotoTag-based upload, and online selling.

When an Event is set up cleanly with consistent cutouts and PhotoTags, photographers can create a full virtual group in just a few clicks — then fine-tune it as needed.

It is simple, powerful, and built directly into NowCandid.

Whether you are creating a sports team composite, school group photo, graduation image, dance group, cheer team, all-star roster, or custom event product, Virtual Group Builder helps you get polished virtual group photos online faster.

Ready to try it?

Open an Event in your NowCandid Dashboard and click Virtual Groups in the sidebar menu to start building. 🎉

Related articles

Weekly Recap: QuicPortraits™, QuicPics™ Updates & More! ✨
Feature Updates
February 28, 2025

Weekly Recap: QuicPortraits™, QuicPics™ Updates & More! ✨

5
 minutes read
Hello, my wonderful photographers!

Candy here, bringing you another Weekly Recap packed with fresh features and improvements to your NowCandid™ experience. Let’s dive right in!

1. Introducing QuicPortraits™ 📸

We’re thrilled to add a new Program to our lineup—QuicPortraits™—joining PartyPics™, GradPics™, Portraits, SportsPics™, QuicPics™, and QuicPics GO™:

  • • One-Time Text Limit: Each image can only be texted out once—perfect for headshots or single-family portraits where you only need to share each image a single time.
  • • Why?: Because of this limit, QuicPortraits™ costs less to use than QuicPics™. It’s a budget-friendly version of the same great service designed specifically for portrait & headshot photography.
  • • No Extra Setup: If you already know how QuicPics™ works, you’ll feel right at home with QuicPortraits™!

A new Quic-Program, with different functionality and pricing!

2. QuicPortraits™ & QuicPics™ Feature Additions 🤳

These upgrades apply to Quic-Events created AFTER today’s system deployment (March 1st):

  • • “Images Are Arriving Soon” Records: View text records in your event’s Marketing History page.
  • • Render Previews for Texted-Out Images: Know exactly when and to whom each image was sent—complete with a small preview.
  • • Unsubscribe Keyword “NOPE”: “Images Are Arriving Soon” texts use “NOPE” for event-based unsubscribes, aligning with other NowCandid™ marketing.
  • • Future Integrations: Under-the-hood improvements now let us potentially add advanced NowCandid™ features (like background removal) to QuicPics™ down the road!
  • • No App Update Required: Older Capture & Upload App versions can handle QuicPortraits™; they just won’t display its icon. For the icon, see iOS version 4.13.72 below.

And good news for existing QuicPics™ fans—our behind-the-scenes tweaks should speed up QuicPics™ deliveries even more!

For when you're curious, or need some help checking on a customer's images!

3. Capture & Upload App for iOS (4.13.72) 🍎

We’ve rolled out Version 4.13.72 with the following fixes and updates:

New Icon: You’ll now see a QuicPortraits™ icon (older app versions don’t show it, but will still function fine).

Photo Booth Mode:

  • • Added two new default backgrounds.
  • • Fixed old artwork sticking around when switching events.
  • • Corrected face tap location on custom background or filtered images.
  • • Fixed bug where filters sometimes failed to apply on uploaded images.

If you’re on iOS, make sure to update for the smoothest experience!

That’s it for this Weekly Recap, folks!

QuicPortraits™ adds a brand-new, simpler way to handle headshots and single-user portrait sessions, while QuicPics™ receives behind-the-scenes speed boosts and more detailed marketing records.

Next week’s recap might be even juicier—stay tuned!

Candy 🍬

Webinars You Can't Miss
Events
February 25, 2025

Webinars You Can't Miss

1
 minutes read

We don’t have any upcoming webinars at the moment, but check back soon for new sessions! Stay tuned for updates.

Photo Booth Recommendations: Post-PBX 2025 Reviews ✨
Photography Tips
February 24, 2025

Photo Booth Recommendations: Post-PBX 2025 Reviews ✨

10
 minutes read

Hey there, NowCandid fam!

Candy here, and I’m excited to bring you my top picks for iPad-only photo booths in 2025 — fresh from the Photo Booth Expo show floor. As you know, NowCandid’s Photo Booth Mode works seamlessly with Canon, Nikon, and Sony cameras. But if you’re looking to simplify your setup, these iPad-only booths are our top recommendations!

Why do we prefer iPad-only?

It’s all about scalability, convenience, and cost savings. While Windows is very customizable compared to Apple, that also opens up your software to various complications & interference from settings & applications across a Windows device. The streamlined software of Apple devices can help reduce those odd issues that pop up occasionally from event to event.

Below, you’ll find three stands we checked out this year, each with a Pros & Cons list and our more detailed “Our Take.” Let’s get to it! 🚀

1. The “Bargain Booth” by Marvel Tech

Price: $549 (or $649 with rolling case)


Link: Bargain Booth on Amazon

• Manufactured by Marvel Tech

• Can be purchased directly on Amazon

• Includes frames for multiple iPad sizes (10.2'' 10.9'' 11'' 12.9'')

• Optional rolling case for an extra $100

Pros:
  • Affordable — Perfect for those on a tighter budget
  • Sturdy, good build quality despite the lower price point
  • Attractive design with body lights + ring light
  • Two remotes to control both the body lights & the ring light
  • Ring light can change color tone (white, blue, yellow) + brightness

Cons:
  • Too tall — even with tilt, shorter guests often appear low in the frame
  • Not super portable — 10 screws for full assembly/disassembly, not counting iPad mounting
  • Can’t keep iPad fully charged on max brightness; battery drain is slower but still present
  • Spinning 360° head can get tilted off-center by guests too easily, unless tightened
  • Carrying case is sub-par (handles sometimes broke off in our tests, no dedicated compartments for each piece)

Our Take

We call this booth the “Bargain Booth” for a reason. At just $549, it offers a really good bang for your buck, especially if you’re not overly concerned about having no-tools assembly or a perfect height. If you’re okay with its tall frame, you could mitigate set-up hassles by keeping it partially assembled and just transporting it in a larger vehicle.

However, the height might be an issue if your events often include younger kids or smaller adults — you’ll either have to tilt it downward a lot (which can distort the perspective) or place the booth next to a short platform for subjects to stand on, to raise them up a bit relative to the photo booth. Another minor inconvenience is that it won’t keep a 12.9-inch iPad Pro fully charged if you’re running maximum screen brightness (which you often do in well-lit or outdoor events). As a workaround, start the event with a fully charged iPad to ensure it lasts 10+ hours.

All in all, if budget is your top priority and you can accept the relatively tall design and some quirky portability issues, the Bargain Booth is a solid choice. We’ve used one ourselves throughout our trade show tour — it survived being shipped around on pallets across the country! That’s a good sign it’s built to last.

Image pulled from this booth's Amazon Store page, linked above

2. The Salsa 2 by Photo Booth Supply Co.

Price: $2,999 (standard package)


Link: Salsa 2 Pricing

Pros:
  • Ultra-portable — No tools, quick assembly
  • Very professional, modern design (and easy to add vinyl wraps)
  • Roamer mode — Detach the base plate for a handheld kiosk
  • Easy "guided access" — Slot to let you press the iPad power button with a paperclip
  • Cooling fans — Great for outdoor or long-lasting events
  • 1-year warranty
  • Comes with a compact rolling case that’s sturdy and well-organized
  • Can keep an iPad fully charged with no battery drain issues

Cons:
  • Expensive — $3,000 when not on sale
  • Limited light control — Currently supports only an all-white ring lamp mode when used with NowCandid's Capture & Upload App
  • No body lights (though custom vinyl wraps can spice it up)
  • 11" iPad faceplate is an add-on ($49 extra)

Our Take

The Salsa 2 was one of the prettiest booths at Photo Booth Expo 2025. Yes, it’s significantly pricier than the Bargain Booth, but that extra cost gets you:

  • • Premium build & design: It looks sleek, modern, and instantly elevates any event space.
  • • Tool-free assembly: You can set it up in minutes, which is fantastic if you’re juggling multiple events or tight on time.
  • • Real portability: The included rolling case feels like well-designed luggage. It’s compact, highly protective, and easy to maneuver.
  • • No battery issues: Unlike cheaper stands, the Salsa 2’s internal wiring keeps your iPad at 100% charge, even at full brightness.
  • • Convenience features: Accessing the iPad’s power button through a tiny opening is genius — it makes entering Apple’s Guided Access mode a breeze.
  • • Cooling fans: If you’ve ever had an iPad overheat while guests queue up, you’ll understand just how valuable built-in cooling can be.

As for the lighting, we loved that the ring light is bright and consistent. However, it would be nice if it could sync or tie in with other software to do color changes, currently it is only available in a plain white “lamp mode” when used with NowCandid. That said, the ring light is extremely usable out of the box, and most guests will probably never be upset it’s just white.

Overall, the Salsa 2 is a fantastic investment if you want a booth that radiates professionalism, sets up easily, and doesn’t skimp on features like cooling or proper cable management. If you’re aiming to scale up your photo booth business and command a higher rate for a premium booth, Salsa 2 is definitely our top pick.

Image pulled from the Salsa 2's "Explore" page, linked above

3. The Helio Sport by ATA Photo Booths

Price: $1,449 (no case), $1,949 (with rolling case)


Link: Helio Sport iPad Booth

• Mid-range option from ATA Photo Booths

• Available in white or black

• Assembly is simpler than the Bargain Booth, but not as effortless as the Salsa 2

• Does not support the 12.9-inch iPad Pro (and requires you to pick a specific iPad size at purchase)

Pros:
  • Reasonably priced for a mid-tier booth
  • Solid build quality and sleek, minimal design
  • No glaring flaws — a stable option that “just works”
  • Vinyl wrapping is easy if you want to customize the look

Cons:
  • Not very feature-rich — Lacks some extras like body lights
  • Height not adjustable — Tilt-only design (however, it's a good height to begin with!)
  • Comes with 1 iPad frame — You must choose the iPad size when ordering; and no 12.9" support
  • Assembly takes more time than the Salsa 2 (though not as much as the Bargain Booth)

Our Take

If you’re seeking a middle ground between the cheapest and priciest booths, the Helio Sport can fit the bill. It doesn’t stand out with flashy body lights or a detachable "roaming booth" head, but it also doesn’t suffer from major flaws. Setup is fairly quick (somewhere between the Bargain Booth’s many screws and the Salsa 2’s tool-free approach). The price tag, around $1,449, places it well under the Salsa 2, but it’s still nearly three times more than the Bargain Booth.

For us, the biggest drawback is that it doesn’t support the 12.9-inch iPad Pro. That’s our favorite iPad size for photo booths, especially if you’re looking to have a large, vibrant display. So if you’re committed to using a bigger iPad, the Helio Sport might not be your best pick.

That said, if you already own a compatible iPad or you prefer something smaller (and you’re on a moderate budget), the Helio Sport remains a solid contender. It has a professional look, decent portability (especially if you spring for the rolling case), and a straightforward operation. It might lack the “wow” factor of the Salsa 2, but if you’re simply looking for a reliable iPad booth with minimal fuss, Helio Sport is a fine choice.

Image pulled from the Helio Sport's store page, linked above

Final Thoughts

In the world of iPad-only photo booths:

1. Bargain Booth (Marvel Tech)Best Value

Great price, tall frame, some minor inconveniences (charging, height, and assembly). Very durable and surprisingly good build quality for the cost.

2. Salsa 2 (Photo Booth Supply Co.)Best Overall

Premium design, tool-free assembly, built-in cooling, and straightforward iPad integration. More expensive but loaded with user-friendly features.

3. Helio Sport (ATA Photo Booths)Honorable Mention

Middle-of-the-road price and features, but lacks support for the 12.9-inch iPad Pro. A decent option if you’re okay with a smaller iPad.

And no matter which booth you choose, remember to:

  • • Use a cellular-enabled iPad Pro for maximum flexibility.
  • • Get a high-quality screen protector for your device.
  • • Enable Guided Access (when able) to keep guests from exiting the Capture & Upload app and poking around in your iPad.

One Last Photo Booth Pro-Tip:

None of our recommendations today have glass screens to cover your iPad, as that tends to make tapping the screen inconsistent. Instead, head to Best Buy or a similar store and buy a protective screen for your iPad. They’ll even apply it for you bubble-free! Many screens have warranties as well, so you can replace them at no extra cost if they crack. This approach keeps your iPad screen protected from scratches while remaining responsive to your guests’ taps, making the experience better for everyone.

And if you have any questions about NowCandid’s Photo Booth Mode, or just want more tips on creating the ultimate interactive photo experience, drop us a line on our Calendly! We’re always here to help.

Happy photo-boothing, everyone! 📸✨

—Candy from the NowCandid Team

Let’s get in touch

If you’re a photographer looking to add NowCandid services to your wheelhouse – set up a call by clicking the button below.

How to customize formatting for each rich text

How to customize formatting for each rich text

How to customize formatting for each rich text

How to customize formatting for each rich text

How to customize formatting for each rich text

What’s a Rich Text element?

The rich text element allows you to create and format headings, paragraphs, blockquotes, images, and video all in one place instead of having to add and format them individually. Just double-click and easily create content.

A rich text element can be used with static or dynamic content. For static content, just drop it into any page and begin editing. For dynamic content, add a rich text field to any collection and then connect a rich text element to that field in the settings panel. Voila!

Headings, paragraphs, blockquotes, figures, images, and figure captions can all be styled after a class is added to the rich text element using the "When inside of" nested selector system.

  • List One
  • List Two
  • List Three
  • List Four
  • List Five

This is a link

This is bold text